Calendar:Events
Instruction for Lightning on Thunderbird
Creating Events
There are a number of ways you can create new events when you are in "Mail Mode":
- Using the menu item "File" -> "New" -> "Event"
- The short-cut CTRL-I
- The "New Event" button in the "Today Pane"
- By double-clicking on "Today", "Tomorrow" or "Soon" in the events overview in the "Today Pane"
In both "Calendar Mode" and "Event Mode" you can use the above methods but you can also use the dedicated "New Event" button in the "Calendar Toolbar".
After using one of the above methods a window will appear, in it put the details of the event in the corresponding fields.
- Title: The name of the event. This is what you will see when you first glance at the calendar
- Location: Where the event will be taking place
- Category: What type of event is it?
- Calendar: Which calendar would you like to store the event in (see Creating new calendars)
- Start and End: Choose the time the event begins, and the time that it ends
- Repeat: If this event will happen again, check this box (see Recurring Events)
- Reminder: Will pop up with an alarm at a specified time before the event.
- Description: A brief summary/list of the event
Add/Invite Attendees
You can invite attendees when creating a new event or when editing an event. There are 2 ways you can invite attendees:
- Using the menu item "Options" -> "Invite Attendees..."
- Using the "Invite Attendees" menu item in the "Events Window"
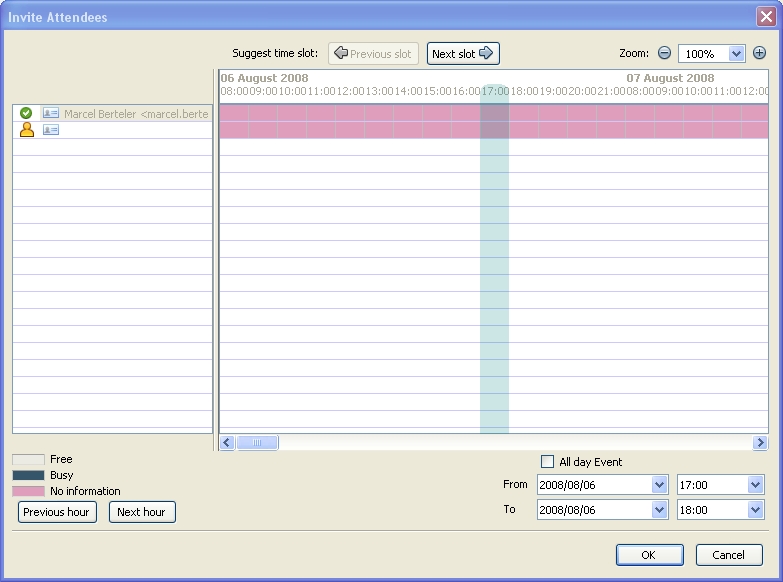
After using one of the methods above, you will see the "Invite Attendee" window:
You can add attendees by adding their email address or name. Your Address book is linked to these fields so auto-complete is working in the same way when composing emails.
You can switch the status of attendees by clicking on the icons in front of their name/email address. The various states are:
You can switch the role of attendees by clicking on the icons in front of their name/email address. The various roles are:


